Saturday, December 31, 2022

Zigbee Home Assistant Migration from SmartThings


In this previous post, I mentioned the Home Assistant SkyConnect USB stick for Zigbee devices.  I started the migration of my Zigbee devices from SmartThings to Home Assistant and wanted to write about some of the steps that worked for me, and some of the challenges that I have encountered.

USB extension

When I first started to attempt to pair devices with Home Assistant, none of them were discovered.  The SkyConnect includes a USB extension cable, that I initially connected between the SkyConnect and my Intel NUC. I figured that either the included cable isn't shielded or long enough, so I got a 3.3ft cable, and that allowed the Zigbee devices to be discovered.

Migration steps

Once the Zigbee devices were discovered, I started the migration process.  Since Zigbee devices can only be connected to a single controller at a time, and these devices have been configured in existing Home Assistant automations, the migration process is a little more involved than with a new Zigbee device

  1. In SmartThings, remove the Zigbee device in the SmartThings application. 

    Removing the devices from SmartThings doesn't remove them from Home Assistant, so there isn't a concern about losing data from the setup in Home Assistant
  2. Now, put the devices in pairing mode, and select "+ Add Device" from the SkyConnect integration in Home Assistant.

    Once the device is discovered, add it to a room and rename it to something appropriate.
  3. For each of the Home Assistant Automations, Scripts, or, Helpers that referenced the device or one of the entities from the SmartThings instance of the device, switch them to the new device or entity from native Zigbee integration.
  4. Once the device integrations have been migrated, then the versions of the device from the SmartThings integrations can be disabled.  (And the entities from the device can be deleted)
With these changes, the devices can be controlled, and data from the sensors access directly.  One important benefit of this integration is that all of this happens locally, and there is a richer set of data that is available through this integration.

Tuesday, December 27, 2022

Portal RTX


During the holiday break, I finally took some time to play the RTX version of Portal.  Portal is a first-person puzzle-platformer developed and published by Valve. It really holds up from when it was originally was released in 2007.  With the ray tracing graphical enhancement, this was a perfect time to revisit the game.

In Portal, you play as a test subject in the mysterious Aperture Science Laboratories, where you are tasked with navigating through a series of increasingly complex and dangerous test chambers using a mysterious device known as the "Aperture Science Handheld Portal Device," or simply the "Portal Gun." This unique weapon allows you to create two linked portals on any flat surface, allowing you to transport yourself and objects between them instantly.

As you progress through the game, you'll encounter a series of increasingly challenging puzzles that require you to use the Portal Gun in creative ways to overcome obstacles and reach your goal. But as you delve deeper into the twisted world of Aperture Science, you'll begin to uncover a dark and sinister plot lurking beneath the surface.

One of the things that sets Portal apart from other puzzle games is its rich, immersive story. The game is set in the same universe as Valve's Half-Life series, and features a cast of memorable characters, including the enigmatic AI entity GLaDOS. The story is told through a series of audio recordings and environmental clues scattered throughout the test chambers, and as you piece together the story, you'll uncover a deeply disturbing and thought-provoking tale of corporate greed, scientific experimentation, and artificial intelligence gone awry.

But it's not just the story that makes Portal so memorable - it's also the gameplay. The Portal Gun is an incredibly versatile weapon, and as you progress through the game, you'll discover new ways to use it to solve puzzles and overcome obstacles. Whether you're using portals to fling yourself across gaps, redirect laser beams, or create makeshift bridges, there's always a new and creative solution waiting to be discovered.

The puzzles in Portal are deceptively simple at first, but as you progress through the game, they become increasingly complex and challenging. Each test chamber is a self-contained puzzle that requires you to use your wits and the Portal Gun to find a way to the exit. Some puzzles require precise timing and aim, while others demand creative thinking and outside-the-box solutions.

But the real beauty of Portal is the way it encourages player experimentation. There's no right or wrong way to solve a puzzle - it's all about finding the solution that works best for you. Whether you're a seasoned puzzle-solver or a newcomer to the genre, there's something in Portal for everyone.

Portal RTX is available for free for anyone that Portal in their Steam library

Monday, December 26, 2022

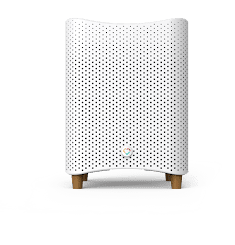
Mila network connected air filter


One of the best appliances that we have bought in the past few years is the Mila network-connected air filter.  This has been especially relevant given the wildfires in California, and the allergies that we have in our house.  We liked these so much that we bought several for different areas of our house.

The Mila connected air filter is a high-tech air purification system that uses cutting-edge technology to keep the air in your home or office clean and healthy. Whether you're looking to reduce allergens, eliminate odors, or simply improve the air quality in your home, the Mila connected air filter is a great choice.

One of the standout features of the Mila connected air filter is its ability to connect to your Wi-Fi network. This allows you to monitor and control the air filter from your smartphone or other device using the Mila app. With the app, you can view the current air quality in your home or office, set up custom air quality alerts, and even schedule automatic purification cycles. This is especially useful for people who are sensitive to allergens or other contaminants, as it allows them to keep track of the air quality in their home or office and take action when necessary.

But the Mila connected air filter isn't just about monitoring and control – it's also about effective purification. The air filter uses a three-stage filtration system to remove a wide range of contaminants from the air. The first stage uses a pre-filter to capture large particles such as dust and pet dander. The second stage uses a HEPA filter to remove small particles such as allergens and bacteria. And the third stage uses an activated carbon filter to remove odors and chemical pollutants. This comprehensive filtration system ensures that your home or office air is as clean and healthy as possible.

Friday, December 23, 2022

NFC tags with Home Assistant


If you're not familiar with NFC (Near Field Communication), it's a technology that allows devices to exchange data by bringing them close together, typically within a few centimeters. And NFC tags are small chips that can be embedded in various materials and contain various information, such as URLs, text, or other data. These tags can be read by NFC-enabled devices, like smartphones or tablets.

Now, let's dive into some creative ways to use NFC tags with Home Assistant. First up: automated tasks and routines. Imagine setting up an NFC tag near your front door that, when scanned with your smartphone, turns off all the lights and locks the door. No more worrying about whether you remembered to turn off the lights or lock the door before you left the house. Talk about convenience and peace of mind!

But it doesn't stop there. You can also use NFC tags to control various smart devices in your home. For example, place an NFC tag near your bed; when scanned, it can turn off the lights and set the temperature to a comfortable level for sleeping. Or, put an NFC tag in your kitchen that, when scanned, turns on the coffee maker and starts playing your favorite morning playlist. It's like having a personal assistant at your fingertips!

In addition to automating tasks and controlling devices, NFC tags can also trigger events or actions within your home assistant system. Imagine setting up an NFC tag near your front door that, when scanned, sends a notification to your phone with the current weather forecast. Now you'll know exactly what to expect when you step outside.

And, let's not forget about tracking and monitoring various aspects of your home. Set up an NFC tag near your front door that logs the time and date of your arrival and departure. Or, put an NFC tag in your home office that logs the time you spend working. This can be useful for tracking productivity or creating a record of your activities.

Thursday, December 22, 2022

ChatGPT


If you're not familiar with ChatGPT, it is a machine learning model that has been trained on a massive dataset of human conversations. Essentially, it's a chatbot on steroids, capable of generating natural-sounding responses to a wide variety of input. This makes it incredibly useful for tasks like customer service chatbots, language translation, and text generation.

But what sets ChatGPT apart from other chatbots is its ability to understand the context and maintain coherence in conversations. It uses a transformer architecture, which allows it to process input in a way that takes into account the relationships between words and the context in which they're used. This means that ChatGPT can follow along with a conversation and generate responses that are relevant and make sense within the context of the conversation.

In addition to its impressive language processing abilities, ChatGPT is also capable of generating responses that are appropriate for a wide range of situations. This makes it particularly useful for tasks like customer service chatbots, where it can provide helpful and accurate responses to a variety of questions and concerns.

One of the most interesting applications of ChatGPT is in the field of language translation. By training the model on a large dataset of translated conversations, it's possible to use ChatGPT to generate accurate translations in real-time. This could be especially useful in situations where human translators aren't available, like in online chatrooms or emergency situations.

However, it's important to note that machine translation is still not on par with human translation, and it likely won't be for the foreseeable future. While ChatGPT and other language models can produce high-quality translations in many cases, there are still situations where the translations may not be entirely accurate or may not capture the full meaning of the original text.

In addition to its potential uses in language translation, ChatGPT could also be used to build chatbots for customer service or to assist with tasks like scheduling and information retrieval. These chatbots could be particularly useful for businesses looking to provide fast and efficient service to their customers, and they could also be used to help individuals manage their daily lives more efficiently.

Another interesting use for ChatGPT is in text generation. The model could be used to generate content for social media posts, news articles, or other types of written content. This could be particularly useful for businesses that need to produce a large volume of written content on a regular basis, as it could save time and resources that would otherwise be spent on creating the content manually.

But as with any technology, it's important to approach the use of ChatGPT with caution. There are potential risks and ethical concerns to consider, and it's important to put appropriate safeguards in place to ensure that ChatGPT is used ethically and responsibly.

Overall, ChatGPT is a powerful tool that has the potential to revolutionize the way we interact with computers and communicate with one another. Its ability to understand and respond appropriately to a wide range of input makes it a valuable asset for a variety of applications, and it will be interesting to see how it is used in the future.

Wednesday, December 21, 2022

Spinning up Minecraft Server


With my kids home for the holiday break, I decided to spin up a Minecraft server for us to play on.  In the past, I used a Raspberry Pi for hosting Minecraft servers.  (For running a Minecraft server on a Raspberry Pi, these instructions are great)  One of the reasons that I am not using a raspberry pi for this new server is that it can get overwhelmed when there is a lot of activity on the server at once. (e.g. when the kids spawn a lot of chickens at once)

I currently have an Intel NUC, that I use to run several servers in our house, including  Plex and Home Assistant servers, running in separate VirtualBox VMs. I figured that I could use another virtual machine for the Minecraft server.

MineOS Turnkey is a Linux distribution that has everything that you need for running a Minecraft server.  In addition to the OS itself, it also includes the MineOS webapp, which enables various Minecraft server jars to be downloaded, and the various instances to be started & stopped.

It is fairly easy to create a virtual machine for the Minecraft server.  First, download the ISO image from the mineos-node site.  Then create a new virtual machine in VirtualBox.  I specify that this will be a 64-bit debian based OS, and allocate 2 Gb of RAM for it.


100 Gb should be enough for the server, so I create a dynamically allocated disk image for it.

That is pretty much all that is needed for creating the virtual machine, but there are a few settings that I like to tweak.  Since I don't have any audio connected to the computer that I run VirtualBox on, I disable audio for this virtual machine.  To make it easier to connect to the server, I switch the to bridged network mode.


At this point, select the mineos-node ISO image for the optical drive of the virtual machine, boot the machine, and run through the setup.

After the installation, the virtual machine should be accessible on the subnet that the host is running.  Once you log into the web interface, you can select which Minecraft server you want to run, and configure it to automatically startup, when the virtual machine starts.

Have fun playing!


2022 Xbox in Review


In previous years, Microsoft provided tools to generate infographics that reflected the activity of Xbox players.  This year, Microsoft didn't make this tool available, but TrueAchievement has made their #MyYearOnXbox tool available that will generate a graphic with the gameplay information from an Xbox profile.

With the tool, you will need to sign into your Xbox account via OAuth, where it will read the games that you have played from your profile.

From my generated image, you can see that the game that I spent the majority of my time in was Far Cry 6 (while I was isolating when I had COVID)

[via Windows Central]


Sunday, December 18, 2022

Self-custody and hardware wallets


Self-custody, or the act of holding and managing one's cryptocurrency rather than entrusting it to a third party, has become increasingly popular recently as more people have become interested in owning and using digital assets. (This is especially relevant with the bankruptcies/failures of centralized exchanges, such as BlockFi, Celsius, and FTX) One way to achieve self-custody is through the use of hardware wallets, which offer a secure and convenient way to store and manage cryptocurrency. In this blog post, we'll explore the benefits of self-custody and how hardware wallets can help you achieve it.

One of the main benefits of self-custody is that it allows you to retain full control over your cryptocurrency. When you entrust your cryptocurrency to a third party, such as an exchange or online wallet, you are relying on that party to keep your assets safe and secure. However, there is always a risk that the third party may be hacked, suffer a technical failure, or otherwise be unable to fulfill its obligations to you. By holding your cryptocurrency, you can eliminate this risk and manage your assets, giving you complete control over your investment.

Hardware wallets are a secure and convenient way to achieve self-custody. These devices are specifically designed to store and manage cryptocurrency and offer several advantages over other storage methods. For example, hardware wallets are offline, meaning they are not connected to the internet and are therefore much less vulnerable to cyber attacks. They also typically have multiple layers of security, such as a password or passphrase, to protect against unauthorized access.

In addition to the security benefits, hardware wallets are also very convenient to use. They are portable, so you can take them with you wherever you go, and they are easy to set up and use, even if you are new to cryptocurrency. Many hardware wallets also have built-in screens, allowing you to easily view and manage your assets without the need for a separate device.

I like the Ledger line of hardware wallets.  They support a large number of coins across several blockchains.  In addition, the ledger wallets support storing and managing NFTs.  The Ledger Live software integrates with several services for managing your assets.

Another advantage of self-custody is that it allows you to take advantage of the full range of options available in the cryptocurrency market. When you hold your cryptocurrency, you are free to buy and sell any digital asset you choose, rather than being limited to the options offered by a particular exchange or wallet provider. This gives you more flexibility and control over your investment and allows you to take advantage of opportunities as they arise.

In conclusion, self-custody and hardware wallets offer several benefits for those interested in owning and managing cryptocurrency. By retaining full control over your assets and using a secure and convenient storage method, you can protect your investment and take advantage of the full range of options available in the cryptocurrency market. Whether you are a seasoned investor or just starting with digital assets, self-custody and hardware wallets are important considerations.


Friday, December 16, 2022

PiKVM v4


The PiKVM v4 kickstarter has launched.  With the v4 version, there are new two different versions of the PiKVM.

The PiKVM V4 Mini uses a small fanless case, and has a lower power consumption than the PiKVM V3.

The PiKVM V4 Plus has the features of the V3 version and adds support for an LTE card and additional USB host support.

Home Assistant SkyConnect


I have been running Home Assistant for a while now, slowly transitioning from SmartThings.  In subsequent posts, I will describe more of my experience with Home Assistant, but today I received a Home Assistant SkyConnect, that I am excited about setting up over this holiday break.

The Home Assistant SkyConnect is a USB Zigbee adapter that directly connects Zigbee devices to Home Assistant.  (I am currently using a SmartThings hub to connect my Zigbee devices, and using the SmartThings integration in Home Assistant)

One thing that I am very interested in for the SkyConnect, is that it is updatable through Home Assistant, and they are planning an upgrade to add Thread support.  With this upgrade, it should support Matter devices.

With Matter's multi-admin support, and when SmartThings adds Matter support, I hope that this will make it easier to finish the migration to Home Assistant.

Sunday, December 11, 2022

PiKVM

 This weekend, I needed to backup a number of computers, and wipe them in preparation for recycling.  As I didn't want to disconnect the monitor and keyboard from my normal workstation, the PiKVM has been quite helpful.


The PiKVM is a raspberry pi based KVM (keyboard, video, mouse) device that allows you to control and view a computer over a network.  

I have been using the PiKVM for a while.  It has been especially helpful for setting up new computers, or managing some of the headless computers that I manage.  For backing up and wiping the computer, one of the PiKVM features has been very useful. 

The PiKVM has the ability to have images stored on the raspberry pi mounted on the connected computer.  I have a few linux distro images stored, that allows me to boot and manage connected computers.

The V4 version of the project has been announced, and should be launching soon on Kickstarter.

Seamless Local Control: Integrating WeatherFlow with Home Assistant Across VLANs

I've been pleased with my Home Assistant setup for some time now. One of my main focuses has been achieving local control. This ensures...